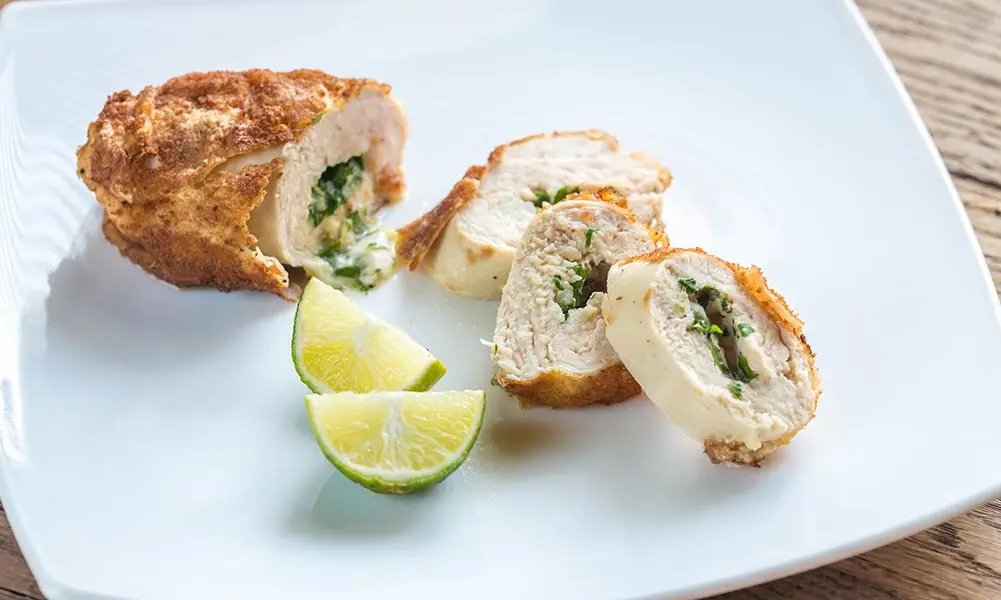
Few dishes feel as indulgent as a perfectly cooked Chicken Kiev. That golden, crispy crust giving way to juicy chicken and a burst of garlicky butter.
If you’ve ever ordered it at a restaurant and thought, I wish I could make this at home, you’re in luck! The good news? It’s easier than you think with the right technique. The bad news? If you cut corners, you could end up with dry chicken or butter that leaks out before you even take a bite.
Follow this step-by-step guide on how to cook Chicken Kiev, and you’ll get that perfect restaurant-quality finish every time.
What is Chicken Kiev?
Chicken Kiev is a classic dish of breaded chicken breast filled with garlic and herb butter. When cooked properly, the crispy outer shell encases tender chicken and melts the garlic butter inside, creating a rich, flavourful bite.
It’s believed to have originated in Eastern Europe, with Russia, Ukraine, and France all laying claim to its invention. But regardless of its roots, one thing is clear: a well-made Chicken Kiev is pure comfort food.
What You Need to Cook Chicken Kiev
Before starting, make sure you have all the right ingredients and tools.
Ingredients:
✔ Chicken breasts – large and skinless
✔ Butter – unsalted, for the garlic filling
✔ Garlic – finely minced for bold flavour
✔ Fresh parsley – adds a bright, herby note
✔ Lemon juice – enhances the butter’s taste
✔ Salt & pepper – for seasoning
✔ Flour – helps the coating stick
✔ Eggs – for the breadcrumb coating
✔ Breadcrumbs – panko or traditional for crispiness
✔ Oil – for frying
Optional but recommended: Add a pinch of paprika or Parmesan to the breadcrumb mix for extra flavour.
Equipment:
✔ Sharp knife – for butterflying the chicken
✔ Plastic wrap & rolling pin – for flattening the chicken evenly
✔ Mixing bowl – for preparing the garlic butter
✔ Freezer – to firm up the butter before stuffing
✔ Deep frying pan or oven – depending on your cooking method
Step-by-Step Guide: How to Cook Chicken Kiev
Step 1: Make the Garlic Butter
The butter filling is the heart of a great Chicken Kiev.
- In a bowl, mix softened butter, minced garlic, chopped parsley, lemon juice, salt, and pepper.
- Shape the butter into a small log using plastic wrap and freeze for at least 30 minutes.
- The firmer the butter, the better it stays inside the chicken during cooking.
✔ PRO TIP: The butter should be very cold before use since this helps prevent it from leaking out.
Step 2: Prepare the Chicken
To create a pocket for the butter:
- Place the chicken breast on a cutting board.
- Use a sharp knife to butterfly it open. Cut a deep slit without slicing all the way through.
- Flatten the chicken gently with a rolling pin until evenly thick.
✔ PRO TIP: Don’t make the slit too big, or the butter might escape while cooking.
Step 3: Stuff and Seal the Chicken
- Take the frozen garlic butter and place it inside the pocket.
- Fold the chicken over the butter and press the edges firmly.
- Wrap tightly in plastic wrap and freeze for 15-20 minutes, as this helps keep its shape.
✔ PRO TIP: You can also use toothpicks to help keep the chicken closed while breading.
Step 4: Bread the Chicken
Set up a classic breading station with three bowls:
- Bowl 1: Flour with salt and pepper.
- Bowl 2: Beaten eggs.
- Bowl 3: Breadcrumbs (panko works best for crispiness).
How to Coat the Chicken Properly:
- Dredge the stuffed chicken in flour, shaking off excess.
- Dip it into the egg wash, coating it completely.
- Press it firmly into the breadcrumbs, ensuring full coverage.
✔ PRO TIP: For extra crunch, double coat. Dip in egg and breadcrumbs twice.
How to Cook Chicken Kiev: Two Methods
1. Traditional Pan-Frying & Baking (Best for Crispiness)
- Heat 1cm of oil in a deep frying pan over medium heat.
- Fry the chicken for 2-3 minutes per side until golden brown.
- Transfer to an oven preheated to 180°C (350°F) and bake for 15 minutes.
- Rest for 5 minutes before serving.
✔ Why This Works: Frying gives the crust a golden crunch, while baking ensures the inside is fully cooked.
2. Oven-Baked Chicken Kiev (Lighter Option)
- Preheat oven to 200°C (400°F).
- Place the breaded chicken on a baking tray lined with parchment paper.
- Lightly spray with oil for crispiness.
- Bake for 25-30 minutes, flipping halfway.
- Rest for 5 minutes before slicing.
✔ Why This Works: Less oil makes it a healthier option, but the crunch won’t be as intense as frying.
How to Serve Chicken Kiev
Chicken Kiev is best served hot and crispy, with sides that complement its richness.
Mashed potatoes – classic and buttery.
Fresh green salad – balances the richness.
Steamed vegetables – a simple, healthy side.
Crusty bread – great for soaking up garlic butter.
Final Thoughts: Master Chicken Kiev at Home!
Learning how to cook Chicken Kiev the right way ensures you get crispy, golden perfection with a rich, buttery centre every time. With a few simple tricks: freezing the butter, sealing the chicken well, and choosing the right cooking method you’ll never need to order it at a restaurant again.
Want high-quality Australian chicken for the best homemade Chicken Kiev? Visit Gingin Grass Fed for premium poultry and beef.
For more expert tips, contact Gingin Beef and start cooking restaurant-quality meals at home!
FAQs
How do I stop the butter from leaking out?
Freeze the butter before stuffing, and chill the breaded chicken for 15 minutes before cooking.
Can I use chicken thighs instead of breasts?
Yes! Chicken thighs work well but will need extra sealing to keep the butter inside.
What oil is best for frying Chicken Kiev?
Use neutral oils with a high smoke point, like vegetable or canola oil.
How do I know when Chicken Kiev is fully cooked?
Use a meat thermometer. It’s internal temperature should be 75°C (165°F).
Can I freeze Chicken Kiev for later?
Yes! Bread it and freeze before cooking, then bake from frozen at 200°C for 35-40 minutes.